

 Installing high-pressure injection ports is pretty straightforward, so I won’t spend too much time on this topic. Just a few quick tips.
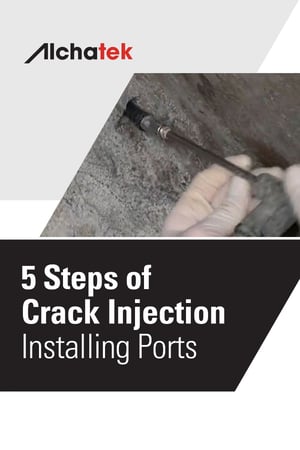
1. Hammer In Ports. Place the port in a clean 3/8” diameter hole and hammer it in. The high-quality materials our ports are made of will take a pounding. But you don’t have to hammer them in too hard. With a little practice, you will begin to notice the sound changes slightly when the port is seated. Use an electric screwdriver or drill with a 5/16” socket to seat the zerk fitting into the port. Also, make sure you have a “T” handle socket for use in areas where water is pouring down on your head (so you don’t short out your electric screwdriver or drill).
You may notice that the bag of ports is wet on the inside when you get them. The water helps the ports stay resistant to cracking.
The downside to Hammer In Ports is that they only contact the concrete in a very small area and make a seal (due to the tapered nature of the port). In good quality concrete, this seal will hold back several thousand p.s.i. However, if the concrete is weak or the drilled hole is out of round, you can have a problem. In which case you want to use a Mechanical Port.
2. Mechanical Ports have dropped in price dramatically over the years due to inexpensive labor and cheaper materials from overseas. There is now little price difference between the Hammer In Ports and the Mechanical Ports compared to what there used to be. I have a personal affinity for Mechanical Ports because I used to make them in my father’s shop back in the early 1980s. They have a much larger surface area to create a seal and will hold more pressure than the concrete can take.
Make sure you seat the rubber all the way inside the hole. If it is partially outside of the hole, it can cause the surface of the hole to spall, chip, and crack. Setting it in at least ¼” past the surface of the hole will give you a great seal and reduce the chance of cracking the concrete unnecessarily.
Snug the ports down, but don’t over-tighten. It is easier than you think to crack the concrete by over-tightening (especially if you have drilled close to the crack or at a very steep angle).
Now that you have the ports installed, you are ready to clean out the crack by flushing water through the ports. I’ll discuss that in the next section.
5 Steps of Crack Injection - Overview
5 Steps of Crack Injection - 1. Drilling Holes
5 Steps of Crack Injection – 1. Drilling Holes (Continued)
5 Steps of Crack Injection – 2. Flushing Holes
5 Steps of Crack Injection – 3. Installing Ports
5 Steps of Crack Injection – 4. Flushing Cracks
5 Steps of Crack Injection – 5. Injecting Resin
Want in-depth info on crack injection procedures and products?

