
When it comes to floor and wall joint leak repairs, there are usually two scenarios to consider. These repair jobs usually come about because of leakage where the floor and wall typically meet. Each scenario determines where drill points should be placed for repair procedures using polyurethane.
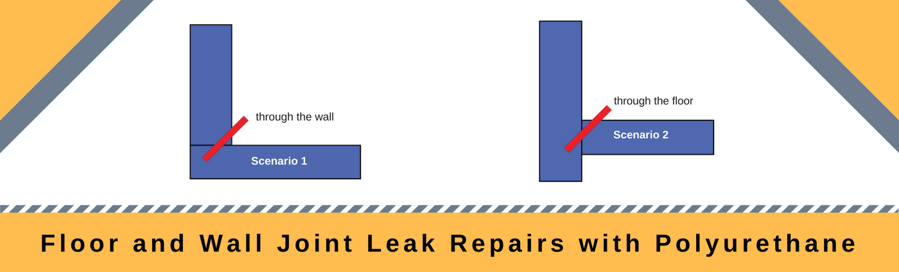
Scenario 1:
 In this scenario the floor has been poured first before a wall is made to confine a space. To fix leaks that occur in this type of joint, a hole is drilled at the bottom of the wall. This is usually about 6-8 inches above the floor and at a 45 degree angle. Once drilled, soaked oakum is then placed in the hole. Once cured, the oakum serves as a gasket and initial leak seal. Polyurethane grout is then pumped into the hole for a deeper seal, while the oakum gasket prevents it from spilling back out.
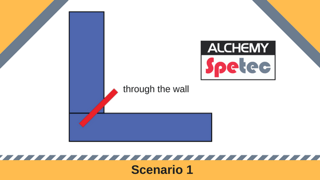
Scenario 2:
-1.png?width=320&name=floor%20wall-%20blog%20(1)-1.png) In this scenario the wall has been poured first before the floor. The hole is drilled on the floor about 6-8 inches from the wall and at a 45 degree angle. Soaked oakum is placed into the hole to create an initial seal and gasket. Polyurethane grout then injected behind it for a thorough leak seal solution.
In this scenario the wall has been poured first before the floor. The hole is drilled on the floor about 6-8 inches from the wall and at a 45 degree angle. Soaked oakum is placed into the hole to create an initial seal and gasket. Polyurethane grout then injected behind it for a thorough leak seal solution.
Materials often used for these applications:
AP Oakum: for creating gaskets
AP Fill 700: for drilled holes that are about 2 inches wide
Spetec F400: for drilled holes that are between ½ and 1 inch wide
AP Seal 500: for tight joints with multiple hairline cracks
Spetec F1000: works well if curtain grouting is needed to drill through brick walls
Want more information on sealing leaks?

